Labels

indicator

Use the tabs above to navigate the topics

Sunday 21 July 2013

Economising on geometry for things such as game or even for simple architectural renderings in 3ds max


When designing for games or you just want to have a huge scene that looks very detailed without increasing the amount of polygons you can simply use the technique of texture baking. This process involves making a geometry with a very low amount of polygons then copying that geometry make it more detailed by adding in extra geometry and details in the geometry like holes etc. The render to texture dialogue in 3ds max allows you to do this by baking in details from the high poly object to the low poly object via maps such as the normal maps and lightmap which you will save out and then plug these maps back into the appropriate material map slots and apply it to the low poly geometry. It is a very simple process but puts you ahead of the game, check out this video which shows you the overall process.

Saturday 20 July 2013

Modeling techniques used in 3ds max

There are many ways to model in 3ds max but you have to start with a particular technique. There are a few ways to start in 3ds max. Here are links to videos on each one. each technique is good for certain purposes and enables you to model with more speed and comfort and also the knowledge of what to next. A big issue i find with people is that they get stuck on on little issues as where to start. Well if you know the techniques you ultimately eliminate that question. As a beginner learn these techniques and you will be ahead in the game, here is also a link to great tutorials (Digital tutors)
Digital tutors have the best self paced tutorials and they come highly and most recommended by me and you can watch them all for free by joining, enjoy!

Box modelling
Polygonal modelling
Spline modeling

GrowFX 1.9.3 Beta for making plants in 3ds max!


Growfx beta version is now available, it is a great plugin and many artists have taken advantage of it over the years. There are also a few others with similar strengths but ultimately when it comes to CG its more of what the artist knows to do than how the software operates. Here is a link to other plant creation softwares that I have personally used over the years aswell.
vterrain
ATree3D
speedtree
onyxtree
xfrog
laubwerk
Here is also the link to the GrowFx beta here

Wednesday 12 June 2013

Viewing Tile able Textures in Photoshop

Ever wondered how to view textures you have just made a tile able texture in Photoshop? here is how you do it taken from "3D Game Textures, Second Edition" just follow the instructions.

Testing a Tiling Texture In Photoshop

After you have rebuilt and repaired the texture to your liking, you
can test the tiling of the texture. This is easy to do using the Define
Pattern option in Photoshop. Note that there is a difference between
defining a pattern and the Pattern Maker. We are defining a pattern
to later fill in an area; this does not alter the image. Pattern Maker
attempts to create a tiling pattern using a selection. Pattern Maker
gives me mixed results, sometimes good and sometimes bad. Even
the good results will require some touchup.
1. In order to get the best result, you may want to first look at
your image size. If you are working on a large image (and you
should be), you might want to create a copy of the image and
reduce it to 256×256 so you can tile it across a larger canvas
without creating a super huge image.
2. Select your entire image (Ctrl+A). You can select an unflattened
Photoshop file, and this method will create a pattern using all
layers that are visible.
3. Go to Edit > Define Pattern. These steps are illustrated in
Figure 4-38.
4. The Pattern Name dialog box will appear and you will see a
small thumbnail image of your pattern and have the option to
name it.
5. Select OK. Nothing will seem to happen, but your pattern is now
in the Pattern Preset Library.
6. Create a new image (Ctrl+N) and make it at least four times the
size of your texture. If your image is 256×256, then make the
new image at least 1024×1024.
7. Select the entire surface of the new image (Ctrl+A).
8. Right mouse click inside the selection and choose Fill.
9. When the Fill dialog box comes up, you will be able to choose
what to use to fill the selection with.

3D Game Textures, Second Edition- Create Professional Game Art Using Photoshop[Team Nanban]tmrg

Monday 20 May 2013

RailClone2 is here!

This is a plugin which  we here at MITVIZ have had a love for ever since it came out, simply because it has the ability to do so much in so little time with just a little knowledge RailClone is a 3DS Max plugin for parametric modeling based on custom geometry parts, definable by the user, and a set of construction rules. This new concept of modeling lets you to build complex and realistic structures for Architectural Visualization, Civil Engineering, Industrial and Interior Design. See the demo here CLICK and here is a coupon link to get it cheaper CLICK. also visit itoosoft to view other products they might have in offer. Read more......

Saturday 18 May 2013

Excellent UV unwrapping tutorial from Autodesk


UV unwrapping can be a hard task sometimes depending on the geometry you are working on so it is fundamental to know the easiest and quickest way to unwrap a model in order to save time and in some cases money. Autodesk has released a string of videos to show you how to unwrap models in a easy way but after watching these videos it in important to take the step much further and learn how to unwrap more complex models. There are also softwares like Unwrella that make like easier by doing the unwrapping process for you almost with the click of a finger. see this series of videos.


Sunday 28 April 2013

Rendering Cars with HDRI as Lighting and Environment with Vray & 3ds Max


Here is on more guys that teaches about rendering objects like cars inside max with very little setup.
Follow the link to aleso3d.com and i hope you enjoy!. More


Friday 26 April 2013

Correcting the Viewport colour display of imported AutoCAD drawings, when added into a Layer in 3Ds Max

Great tutorial taken from Jamiecardoso's blog and very useful when importing cad data from autocad enjoy


Often, imported AutoCad drawings lose their original colour once added into a new layer (using “Manage Layers” toolbar) in 3Ds Max.
This “glitch” usually frustrates numerous users for a number of reasons, as colour coded drawings help to quickly understand the design and to easily “select by colour” any given layer/s of the relevant drawing in the 3Ds Max scene.
After countless requests to post an article/tutorial on how to correct this problem, I have finally managed to put something together with help of a prolific script writer/ senior Visualiser/Photographer calledDavid Venables.

David created a simple script to override the above mentioned problem!
I have had the pleasure to meet and continue to work with David while at AVR London.

David Venables can also be contacted via LinkedIn Here.
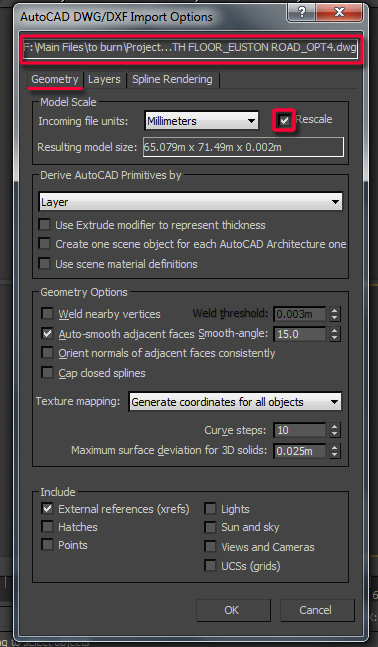
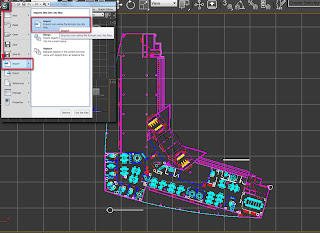
Without further ado let us start by importing an AutoCAD file format (i.e. DWG) into 3Ds Max.


With the DWG file imported into Max, the next step is to quickly create a simple script and apply it.
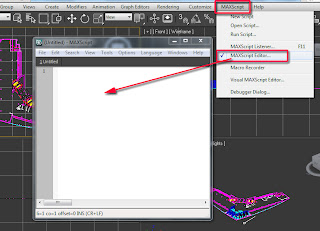
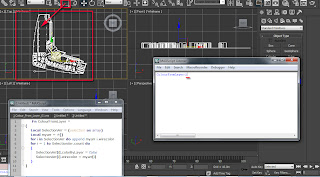
A- Click on the “MaxScript” button from the main toolbar, and choose the “Maxscript Editor” from the dropdown list, to open its dialog box.
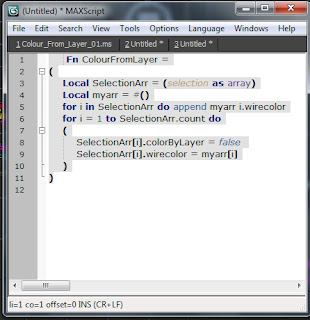
B-Copy and paste the following text/script created by David, into the text field of the “Maxscript Editor” dialog:


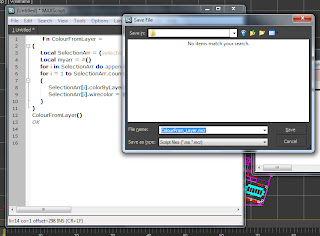
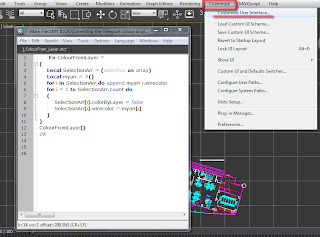
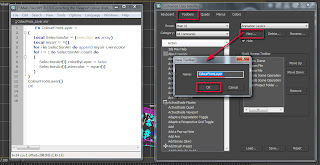
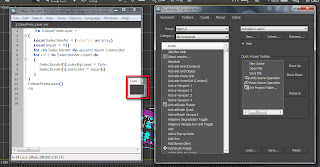
Fn ColourFromLayer =

(

Local SelectionArr = (selection as array)

Local myarr = #()

for i in SelectionArr do append myarr i.wirecolor

for i = 1 to SelectionArr.count do

(

SelectionArr[i].colorByLayer = false

SelectionArr[i].wirecolor = myarr[i]

)

)


The next step is to “Evaluate” the script.
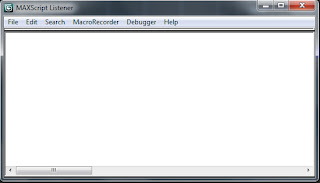
A- To do so, first open the “MaxScript Listener” dialog by pressing the “F11” key.


B-Next, select the “Maxscript Editor” dialog and press “Ctrl+E” to evaluate the script for any possible errors. Alternatively, simply go to “Tools” and choose the “Evaluate All” option from the dropdown list.
The “ColourFromLayer()” text should automatically appear in the text field of the “MaxScript Listener” dialog…without any red text errors.


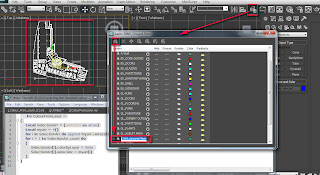
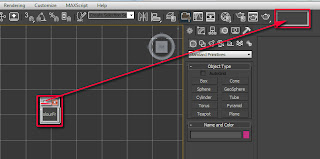
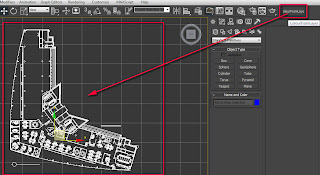
Following that, select the entire imported drawing with the “Selection Region” tool.


To apply the script to the selected drawing, simply go to the text field of the “MaxScript Listener” dialog; ensure that a blinking vertical text bar is in front of the “ColourFromLayer()” text ,followed by pressing “Enter”. The “OK” text should appear, and the blinking vertical text bar should automatically jump below it…without any red text errors.


This is an indication that the script had been applied successfully.


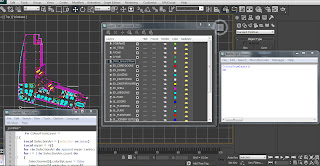
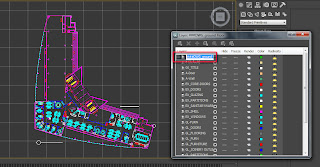
To test whether or not the script will serve its purpose once the drawing is added into a new layer, first open the “Manage Layers” dialog by clicking on its button on the main toolbar.While the drawing is still selected, create a new layer by simply clicking on its button in the “Manage Layers…” dialog. Also, re-name the layer.


The entire content of the drawing should now be part of the newly created Layer, with the drawing’s original colours intact. Press "Ctrl+D" to unselect everything in the 3Ds Max Scene.


If/when satisfied with the results, save the script by first selecting, right clicking and copying the “ColourFromLayer()OK” text from the “MaxScript Listener” dialog; followed by pasting it onto the “Maxscript Editor” dialog. Ensure the newly pasted text is below the existent ones.


Next, press “Ctrl+S” to save it as a *.mcr.* file format in an accessible shared location.


To quickly be able to deploy this script in future occasions, users often run it off the Max quad menu or as a toolbar button.
Too add it as a toolbar button, simply click on “Customize” main toolbar and choose the “Customize User Interface” option from the dropdown list.
Its dialog should open. Under the “Toolbars” tab, create a new toolbar, by clicking on the “New” button.

In the “New Toolbar” dialog, name it accordingly and “OK” to close the dialog. A new toolbar button should automatically appear.


With the new toolbar button created, one can now close the “Customize User Interface” dialog.


Next, we are going to drag and drop the previously created script text in its entirety from the “Maxscript Editor” dialog into the newly created toolbar button.
An image button should automatically appear in the newly created toolbar.
To edit its appearance, simply right click on its image and choose to “Edit Button Appearance” from its pop up menu.


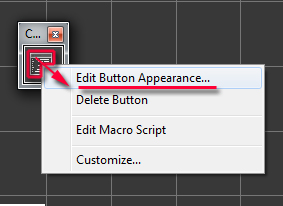
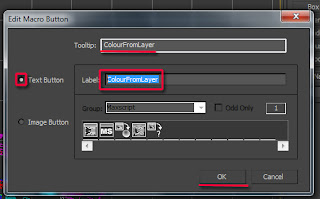
The “Edit Macro Button” dialog should open. By default it is set to “Image Button”.


One can change it to “Text Button” type and name the “Label”, as well as the “Tooltip”. This action will allow users to see the name of the script on the button, as opposed to the previous default “Image button”
Once satisfied, “OK” to close the dialog.


Place the newly created toolbar close to the others, by simply clicking and holding on the top edge of its button; followed by dragging /placing it adequately.


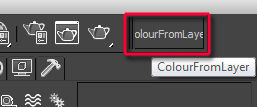
Finally, close and restart 3Ds Max. The newly created toolbar button should now be visible/part of the main toolbar.


To test whether the new toolbar is working or NOT, import a completely new drawing into 3Ds Max.


Select the entire drawing as previously done and apply the script bysimply clicking on the “ColourFromLayer” toolbar button created earlier.


Next, reselect the entire drawing and add it to a completely new layer as previously done.
As one can see:The drawing's original colours remained intact when added into a new layer...which is a clear indication that the new toolbar button worked as expected!

Tip: Adding a “#” before the layer name will ensure the newly created layer always stays on top of the list.


I hope you have found this tutorial/article and the script useful!

Saturday 20 April 2013

Compositing V-ray Render Element Layers in Photoshop

Here we go guys, one of the best Vray render elements tutorials out there. Its very long to read but its a great eye opener for those who want to get the most out of rendering using Vray. This come highly reccommended by us here at MITVIZ, so please enjoy! More

Vray Render Elements Description

We all know the Vray render elements tab in 3ds max in the render setup dialogue box but how many of us use it or know what each render element does? well here is a list and description of each render element and there will be a follow up with a tutorial on how to use some essential render elements in you production pipeline. More

Wednesday 17 April 2013

Excellent modelling practice for 3ds max


Makes modeling an iphone alot easier for a beginner is these videos come highly recommended, take a look!

Tuesday 16 April 2013

VWA Club Artist | April 2013 | Winner: Cheol-min Kim

Nursery- New project from Vladimir Bolotkin


Inspiring work from Vladimir and worth a shout out on our blog
facebook link here
visit his blog also here

CHAOSGROUP FMX 2013!


Don't miss this event which can even be streamed live online if you cannot make it there. Fun packed workshops on vray and other industry standards. see the link for more
visit the official website HERE

Wednesday 3 April 2013

ARCHITECTURAL 3D AWARDS 2013

The CGarchitect.com Architectural 3D Awards were started in 2004 to recognize outstanding achievement in the field of architectural visualization. In such a competitive field it becomes more and more difficult make yourself seen. With the wide visibility of CGarchitect, what better way to use this exposure than to help the artists that make up our community. 2013 marks our 10th annual awards, which will once again take place in La Coruna, Spain during the Mundos Digitales conference. Past awards have taken place in Los Angeles, San Diego and Boston. Over the past nine years many extremely talented individuals and companies have gone on to form new alliances and partnerships and advanced their careers. More!

Friday 29 March 2013

INTERIORDECK INTERNATIONAL STUDENT DESIGN CONTEST


It is an bi-annual contest for interior design and architecture students. At the beginning of every semester, a project which could be a house, a restaurant, an office, etc. is presented and the participants are asked to design the interiors. The projects are always fictional; and a series of requirements should be fulfilled. For every contest there is a professional jury based on the country the project takes palce.
The current contest is called Snow Haven. The project to be designed is a house placed in the Aran Valley (Vall d’Aran), in the Catalan region, surrounded by 3,000-metres
peaks and more than 200 lakes.
For further details of the project, contest and the prize and jury, you can visit www.interiordeck.com

Thursday 28 March 2013

Hand made Architectural modeling still alive!

True Caribbean talent, Artist and Architect Kamaal Manboard proves his architectural talent by creating a hand made model for a Major resort "White Sands". See more of this project of facebook! More

Zlota 44 building in Warsaw on Ronen Bekerman


Some images for project of Zlota 44 building in Warsaw,Poland done by visual studio on Ronen Bekerman.com, More!

Architects win wood design award


Architects win wood design award: Former Whistler firm now based in Squamish surprised by victory

Wednesday 27 March 2013

Apartment interior-Architectural visualization


Apartment interior is a new interior render completed by the vietnamese artist Ln Anh Thi. See the new set here on Behance.

Project De Alliantie | Villa Industria-George Nijland


See the new Interior architectural Visualizations from George Nijland on Behance

Evermotion just published Archinteriors vol. 29

Evermotion's Archinteriors vol. 29 includes 5 fully textured loft interior scenes. Every scene is ready to render with professional shaders and lighting and includes 3 camera setups.
New in this collection: every interior is fully created, not only in the camera views.
All scenes are prepared for V-ray 2.0 with 3dsmax 2010.
All presented renders are with postproduction. PSD files are included. More? then go!

Monday 25 March 2013

FAUP Full Exterior Scene - FREE DOWNLOAD!


Metro Cubico Digital has now offered up a full 3D scene complete with plants and materials etc. See the link post on Chaosgroup and see the images on their website.Check it out! More.

Modeling the Mesa Table


New modeling tutorial from Viscorbel!  a must see.More

Sunday 24 March 2013

Making of Scandinavian Summer House

Earlier this month, 3Dstudija studio posted their “Scandinavian Summer House” visuals on the forums and these immediately captured my attention. I’m not that familiar with the Scandinavian “Look & Feel”, but it sure reminded me of my Mediterranean local with a “Drop Dead Gorgeous” 3d Groundwork – Some of the best I’ve seen to date! I had a chat with the Maciulis Brothers, Matas & Antanas about this project and this article was born. Enjoy it.